The high dynamic range (HDR) is a beautiful thing. It’s how we see things in real time with our eyes. However, the problem is our DSLRs are not smart enough to do that.
Cameras can set exposure to one dynamic range at a time. While looking at a nice landscape, you are able to set the exposure just enough to get either the clouds, the mountains or the sun at one shot at a time. However you will never be able to get all of them right in one singe image (which is also the answer to the question “why can’t my camera shoot exactly what I see).
That’s where the process of HDR photography comes in. It’s where you shoot exposure bracket images, mix them, get the best exposed bits of every image and smash them together in one image to get a perfectly exposed HDR shot.
HDR using Lightroom
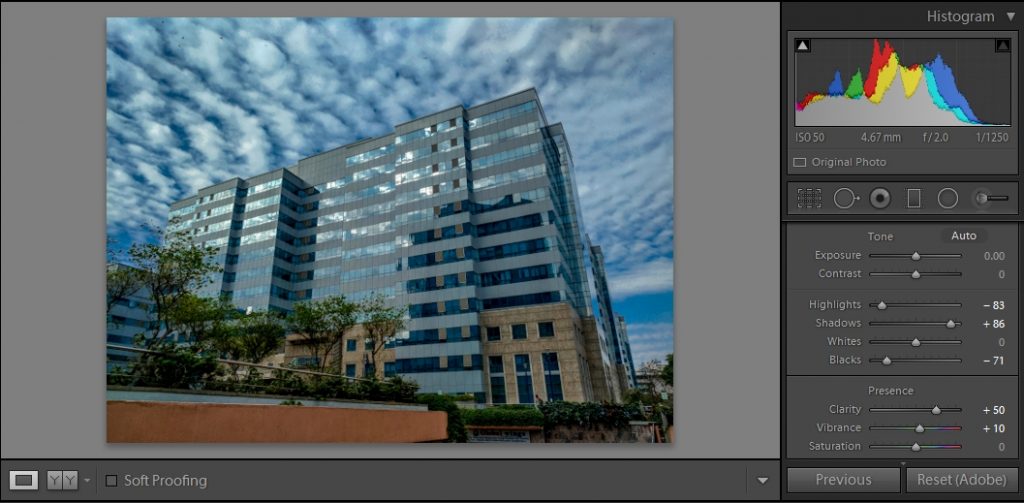
Here’s a tutorial on how to do single image HDR using Lightroom and how to use the power of raw processing.
Step 1: Shoot in RAW
If you have shot your image in JPEG, you can stop reading right here. This tutorial only works if you have shot in RAW. Import your RAW file by navigating and selecting it through the Lightroom library.
Step 2: The shadows slider
Lightroom has a very intelligent algorithm. When you move the shadows slider to the right, it will only increase the brightness of the dark areas leaving the other mid and high tones unaffected. Use this to brighten up the shadow and other dark areas.
Step 3: The highlights slider
This has the same beauty like the shadows slider. This one, however, affects the bright spots alone in the image. Instead of the highlights slider, I tend to bring it all the way to the extreme left in most of my images (HDR or not) because it’s easy to lose most details in the over exposed bright spots (not the totally blown out white spots, they are unrecoverable). In HDR, moving the highlights slider to the left helps in bringing out the details of a cloudy sky but like I said before, I tend to do it all the time.
Step 4: Black and white sliders
Highlights and shadows affect the overall bright and dark areas of an image respectively. However, they also tend to affect those objects that are naturally black or white in nature. For example, the hair of the subject in your image are black, the shadows slider will also increase their brightness when moved to right. So to keep black objects black and white objects white, we have the black and white sliders. Use them in moderation, though. Moving these sliders to their extremes will pretty much nullify the effect of highlights and shadows sliders.
Step 5: Clarity
I just love the clarity slider. Most photographers compare its effects to be similar to adding sharpness but it’s completely different. While I increase the clarity by moving the slider to the right in landscape shots, I also tend to decrease it by moving it to the left in my portrait shots to add softness.
Step 6: Vibrancy
Vibrance easily pops up the colours in your images unlike saturation. Move the vibrance slider to the right to increase it. Once again, please do not over-do it.


